

Content
Introduction
Installing a DHB Taxi Rear Seat Display requires a reliable connection to the vehicle’s power system. The DHB display is supplied with a dedicated power cable that connects the display to the vehicle’s electrical system.
The power cable has three wires: B+, ACC, and GND. Each wire has a different function and must be connected correctly to ensure reliable operation of the Taxi Rear Seat Display.
This guide explains how to connect the power cable, locate the vehicle fuse box, identify suitable power terminals, and test the voltage with a multimeter.
Taxi Rear Seat Display Power Wiring
The DHB Taxi Rear Seat Display uses three main power wires:
- B+ – Constant power
- ACC – Ignition-switched power
- GND – Ground
These three wires connect the display to the vehicle’s electrical system and allow the display to respond to the vehicle’s power status.
Step 1: Prepare the Taxi Rear Seat Display Power Cable
First, find the power cable included in the packaging of the DHB Taxi Rear Seat Display.
One end of the cable has a BMW-style connector for connecting to the display. The other end has three power wires:
- B+
- ACC
- GND
Please identify each wire correctly before starting the installation.
Step 2: Locate the Vehicle Fuse Box
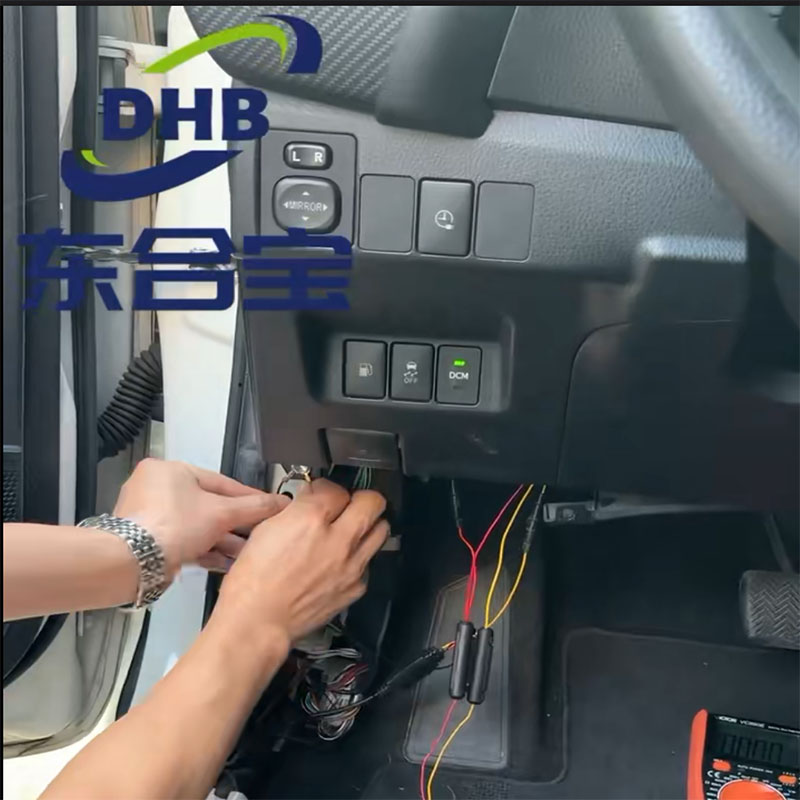
Find the fuse box inside the vehicle.
For most vehicle models, the fuse box is located under or near the steering wheel. However, the exact location may vary depending on the vehicle model.
If you cannot locate the fuse box, please refer to the vehicle owner’s manual.
Step 3: Understand B+, ACC, and GND Wiring
B+ — Constant Power
The B+ wire should normally be connected to a fuse terminal that provides approximately 12V continuously, whether the vehicle is started or not.
Typical voltage:
- Vehicle not started: approximately 12V
- Vehicle started: approximately 12V
B+ provides constant power to the Taxi Rear Seat Display.
ACC — Ignition-Switched Power
The ACC wire should normally be connected to a fuse terminal that provides approximately 12V only after the vehicle starts.
Typical voltage:
- Vehicle not started: 0V
- Vehicle started: approximately 12V
The ACC signal allows the Taxi Rear Seat Display to detect the vehicle’s ignition status and control its operating state accordingly.
Note: Depending on the vehicle and installation requirements, B+ may also be connected to a switched 12V terminal.
GND — Ground
The GND wire must be securely connected to the vehicle’s main metal chassis.
The grounding point should have reliable electrical contact with the vehicle’s metal frame. Avoid connecting GND to painted, insulated, or poorly conductive surfaces.
Step 4: Test the Vehicle Fuse Box Before Installation
Before connecting the power wires, use a multimeter to test the voltage of suitable fuse terminals.
This step is important because the fuse layout and power behavior can vary between different vehicle models.
Test each suitable terminal in two conditions:
- Vehicle not started.
- Vehicle started.
Compare the voltage readings to identify:
- Constant 12V terminals for B+
- Ignition-switched 12V terminals for ACC
Recommended Fuse Connections
Many vehicles have unused fuse positions in the fuse box. The fuse box cover or vehicle fuse diagram may help identify these positions.
As a general reference:
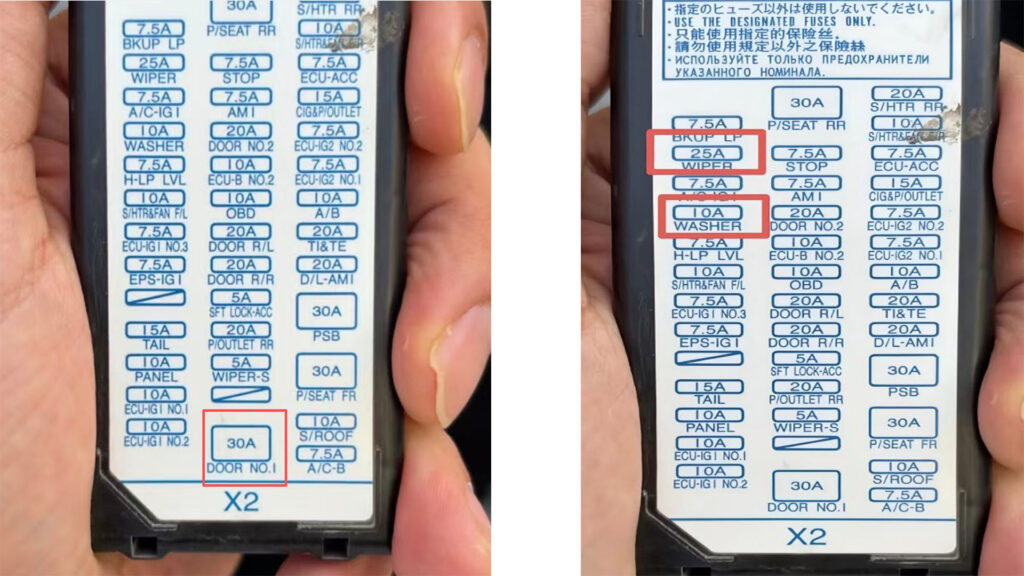
Door-related fuse terminals usually provide 12V whether the vehicle is started or not. These terminals can be used for B+.
Wiper and Washer fuse terminals often provide:
- Vehicle not started: 0V
- Vehicle started: approximately 12V
Therefore, these terminals can be used for ACC.
However, fuse behavior can vary between vehicle models. Always test the actual voltage with a multimeter before making the final connection.
If testing shows that a Wiper or Washer terminal provides continuous 12V, it may also be used for B+.
Step 5: Connect the GND Wire
The GND wire must be connected to a reliable metal grounding point on the vehicle chassis.
Make sure the grounding point:
- Has direct contact with the vehicle’s metal frame.
- Is securely fixed.
- Is free from paint or insulation.
- Provides a stable electrical ground.
A poor ground connection may cause unstable operation, startup problems, or intermittent power issues.
Please refer to the DHB installation video for an example of a suitable grounding point.
Recommended B+, ACC, and GND Wiring
| Wire | Function | Recommended Connection |
|---|---|---|
| B+ | Constant 12V power | Fuse terminal with approximately 12V when the vehicle is OFF and ON |
| ACC | Ignition-switched 12V | Fuse terminal with 0V when OFF and approximately 12V when ON |
| GND | Ground | Vehicle metal chassis |
Important Installation Notes
Before completing the Taxi Rear Seat Display installation, please follow these precautions:
- Always test the fuse terminals with a multimeter before connecting the display.
- Do not assume a fuse terminal has a specific voltage without testing it.
- Vehicle electrical systems may vary between different models.
- Make sure B+ and ACC are connected to the correct power sources.
- Make sure the GND wire is firmly connected to the vehicle’s metal chassis.
- Do not connect GND to painted or insulated surfaces.
- Use an appropriate fuse position according to the vehicle’s electrical system.
- Make sure the power connection is secure before operating the display.
- If you are unfamiliar with vehicle electrical systems, have the installation performed by a qualified automotive technician.
Conclusion
Correct power wiring is essential for reliable operation of a DHB Taxi Rear Seat Display.
The B+ wire should normally connect to a constant 12V power source, while ACC should connect to a switched 12V source that becomes active when the vehicle starts. The GND wire must be securely connected to the vehicle’s metal chassis.
Because fuse configurations and power behavior can vary between vehicle models, always use a multimeter to test the fuse terminals before making the final connection.
Following the correct Taxi Rear Seat Display installation procedure helps ensure stable operation and allows the display to respond correctly to the vehicle’s power status.
FAQ
1. What power wires are used for a DHB Taxi Rear Seat Display?
The DHB Taxi Rear Seat Display uses three main power wires: B+, ACC, and GND.
2. How do I connect power to a Taxi Rear Seat Display?
A Taxi Rear Seat Display can be connected to the vehicle’s fuse box using B+, ACC, and GND wires. Always test the fuse terminals with a multimeter before making the final connection.
3. What is the B+ wire used for?
B+ provides constant power and should normally be connected to a fuse terminal that provides approximately 12V whether the vehicle is started or not.
4. Where should the ACC wire be connected?
The ACC wire should normally be connected to a fuse terminal that provides approximately 0V when the vehicle is not started and 12V after the vehicle starts.
5. Where should GND be connected?
GND should be securely connected to a suitable metal grounding point on the vehicle’s main chassis.
6. Can the door fuse be used for B+?
In many vehicles, the door-related fuse provides constant 12V and can be used for B+. However, always confirm the voltage with a multimeter before making the connection.
7. Can the Wiper or Washer fuse be used for ACC?
In many vehicles, Wiper and Washer fuse terminals provide 0V when the vehicle is not started and approximately 12V after the vehicle starts, making them potential ACC connections.
Always test the actual vehicle before making the final connection.
8. Why should I use a multimeter?
Fuse layouts and power behavior vary between vehicle models. A multimeter allows you to accurately identify constant 12V and ignition-switched 12V terminals before installing the Taxi Rear Seat Display.
CTA
Need Help With DHB Taxi Rear Seat Display Installation?
If you need technical support for Taxi Rear Seat Display installation, vehicle power connection, or selecting the right taxi advertising display for your project, the DHB team is ready to help.
WhatsApp: +86 13422871594
Email: zt@donghebao.com
Contact Us:About Us | Leading Taxi Advertising Company – DHB Taxi Ad
Contact DHB for professional Taxi Rear Seat Display, Taxi Headrest Display, Taxi Advertising Display, and OEM & ODM solutions.